AFO 221 – Receive without barcode
221.1 Introduction
Registering receipts is done via AFO 221. This AFO enables you to register the receipt of one, more or all ordered items / volumes.
Normal receiving of items will be explained, as well as some exceptions like:
· Receiving non-ordered items
· Receipts that do not completely match the order (e.g. volume for was ordered but on receipt this turns out to consist of two parts: volume 4A and volume 4B)
Receiving can affect the budgets in certain cases (i.e. when you have chosen to update the commitments at time of receipt).
We will also describe what happens (can happen) when items are not received. In such cases the claims mechanism, and possibly the cancellation mechanism, will be activated. This mechanisms are described in detail.
For certain types of orders, for example, gifts and approvals, the receipt of materials and the order are registered at the same time. No special actions are then required for receipt of these materials
Three statuses are possible for receipts on the survey screen of a purchase order, namely N (nothing has been received), P (the order has partly been received) and T (the total order has been received). The last two statuses are determined by the date of the most recently received item.
Also bear in mind that an item received cannot be registered if the order status is I (input) or G (locked). In other words, the receipt of an item can only be registered if the status of the order is V (sent). There are exceptions to this, approvals for example, whereby registering the receipt of materials automatically occurs at the same time the order is input.
AFO 222 (‘Receive by barcode') registers materials received via their barcodes. This method of registration can in certain situations be used as an alternative to AFO 221. For additional information see the section on AFO 222
221.2 Receive without barcode
After choosing this AFO the standard search screen is shown, where you can search by elements of the title (standard tab) or order number (system tab). After selecting the correct title you must double click on the ‘Order' line, which opens the overview of orders linked to this title. Here you can select the correct order. The most recent order will be at the top of the list.

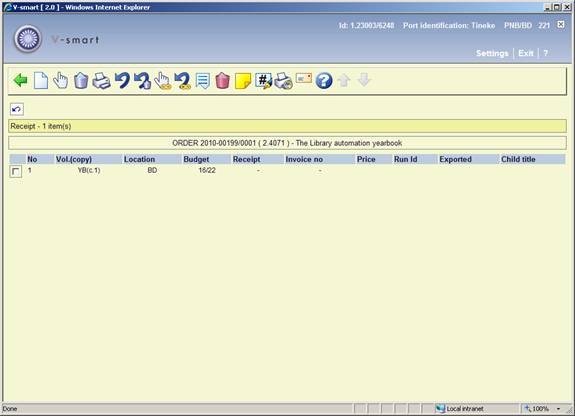
After selecting an order an overview of the ordered items is presented. This screen shows a list of all ordered items (copies / volumes) for all partial orders of an order (.i.e. total quantities ordered for all locations).

Columns on the screen
vol. copy: Volume and copy numbers. For a monograph the system will display the minus sign (-) as volume number.
Location: The location for which the material was ordered.
Budget: The budget from which funds have been allocated for this order.
Receipt: Once an item has been received, the receipt date will be displayed here.
Invoice no.: Once an invoice number has been entered for the item, this number will be displayed here.
Price: Once a price has been entered for the item, the amount will be displayed here.
Run Id: When you use the facility for exporting acquisitions information, the Id of the export run will be displayed here.
Exported: When you use the facility for exporting acquisitions information, the date of the export will be displayed here.
Alternatively this column may contain the data of a manual claim (see section 221.2.2).
Child title: only applicable for a parent order. See section 221.3.
Options on the screen
: This option is mostly used in combination with the S option (delete item - the abbreviation orginates from the Dutch ‘schrappen') and is hence also used if the number of volumes received does not correspond to the number of volumes ordered. If you select this option an input screen will be displayed. With this screen you can add an item by hand to the list of items ordered. Enter the volume number, number of copies, location, base fund and, if necessary, annotation on this screen.
Example
Volume 3 has been ordered. On delivery it proves to comprise two separate volumes, volume 3A and volume 3B. First delete volume 3 (using the ‘Delete item' option) and then enter volumes 3A and 3B with this option (i.e. the ‘Input' option).
Note:
Like the S no. option, this option is not meant to be used for cancellations (read the relevant section in the introduction to this chapter) or incorrect orders (read section 6 for more information).
The system will then display the overview screen again with all the items ordered, including the item you have just added. It is possible to register the receipt of an item immediately after the order has been entered.
:Select an item and click on this option to register receipt of that item. The system will respond by entering today's date in the ‘received' column. The status of the purchase order will then be amended. If all of the items have not been received the status will be changed to ‘Partial'. This status is displayed on the purchase order survey screen. Depending on which bookkeeping model your system uses, you need to enter the following:
· The actual price to be paid for the item received
· On which invoice this item appears
See the general help for this module for more information on the bookkeeping models.
:Select an item and click on this option to remove the item from the list. This option is used when the physical number of volumes received does not correspond to the number of volumes ordered. For example, an item in three volumes has been ordered but on receipt the item is found to comprise only two volumes. The third volume can be deleted with this option. This will result in the text ‘deleted' being displayed in the fourth column (receipt).
Note:
This option is not meant to be used for cancellations (if necessary see the appropriate section) nor incorrectly supplied orders. In the case of the latter it is more correct to input a new order with the order type ‘approval'. For more information see the section on AFO 211 (‘Purchase orders').
: It is possible to generate receipt slips when the receipt of individual items is registered. The working of this option is determined by parameter settings in AFO 271. See the description of this AFO for more information.
:Select an item and click on this option to cancel the receipt of the item chosen. The date of receipt is deleted from the fourth column (receipt) and the system treats the item in question as not received. Cancellation of a receipt is the opposite to the registration of a receipt.
: Select an item and click on this option to reverse the deletion of that item. The text ‘deleted' will then be removed from the fourth column.
: With this option all the items displayed are registered as received
: With this option you can reverse the receipt of all the items displayed.
: See section 221.2.1 for a description of this option.
:Select an item and click on this option to delete that item from a sub purchase order.
: Select an item and click on this option to add a note.
:Select this option to amend the description of the volumes of an item. This option is only active for a multi volume order.
: Use this option to reprint receipt information. Select which already received items you want to print a receipt slip for. You can make multiple selections from the list of displayed items on the Receiving screen. The system will display a message with the total number of receipts marked for reprint.
Printing of the receipt slips is done either by selecting the option or exiting the Receiving screen.
: See section 221.2.2 for a description of this option.
221.2.1 Display other data
This option is the same for AFO's 221 and 223.
When choosing this option you get a different presentation of the overview screen for all ordered items:

Columns on this screen
Description of additional column on this screen:
Annotation : a note (which can only be added to multi part titles).
When you click the icon ‘Display other data' again, the presentation of the overview screen is again slightly different:

Columns on this screen
Description of additional columns on this screen:
Year: The fiscal year, this is populated when you do global registration or enter a price with the invoice number from ordering (or AFO 224, etc).
Pay bud.: The budget from which the item was paid (if different from the ordering budget).
Ent. price: The unit price entered on the order.
Inv. price: The invoice price as entered on receipt.
Inv. date: The date on which the invoice was registered in the system.
221.2.2 Manual claim
To generate a manual claim select a line or multiple lines and the option.
You will be prompted for verification:

If you click no claim is generated. If is clicked then the Manual claim will be generated for the selected line(s).
If : has been clicked the system will switch to the standard form for generating output.
Note
The system can only generate a first claim in this way.
Once you have generated a claim, this information will be shown in the Exported column:

221.2.3 Order overview screen
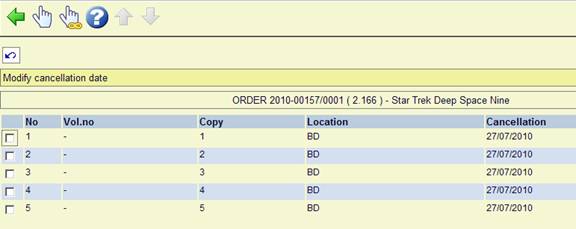
Once all or some items have been received you can return to the overview screen of the order. Depending on whether or not you have received all items, the Receipt status (line 8) will be Completed or Partially.

Options on the screen
: not available on an order that has already been printed.
: select a line and then this option to look at more details of that line. Not all fields will be available, depending on which line you choose.
: this option takes you to the AFO 241 screen of the current supplier, where you can update supplier information. See the help of AFO 241 for more information.
: to reprint the order.
: when you select this option, the bibliographic record will be displayed in read-only mode.
: when there is more than 1 partial order, this option can be used to switch to the details of another. The system will first display a summary screen.
: not available on an order that has already been printed.
: with this option price and invoice number can be entered on an input screen en then be used on the receiving screen (only if receiving has not yet been completed).
: this will switch to the AFO 222 screen. See the help on that AFO for more details.
: only available if an invoice number has been registered for this order.
: this swill switch to a screen with budget details.
: with this option the price can be entered on an input screen en then be used on the receiving screen (only if price information has not yet been entered).
: choose a line and then this option to undo the action. Not available for all actions.
: this will display a brief overview screen of when and by whom the order was created and modified.
: this option will take you back to the search screen.
: this will switch to the display of the order header information.
: This option is only available for standing orders. See section 221.3 for details.
: This option is only available for serials subscriptions. See the help of AFO 211 for details.
Note
Budget information in the partial order can be updated after receipt, as long as the order has not been invoiced yet.
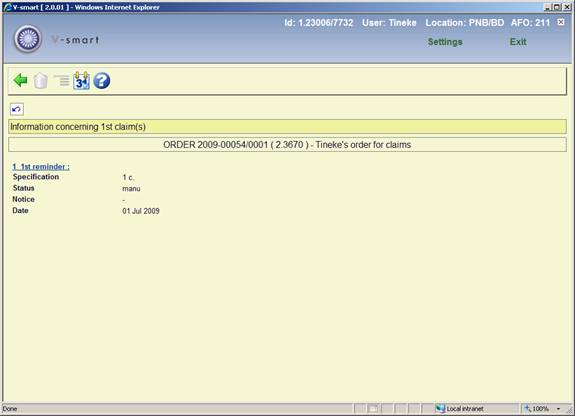
221.2.4 Claiming
At the time the order was created, dates were added for claim 1, claim 2 and cancellation (either derived from the supplier record or entered manually). Until action is taken, the staus will be "Not".

You can adjust this claim cycle by selecting line 10. After this an input form will be displayed:

You can enter a positive number to put the claim cycle further in the future or a negative number (e.g. -10) to bring the claim cycle forward. You cannot bring it further forward than 'today'.
After clicking an overview screen will be displayed:

You can now select one line to reset the cycle for that copy only or use the option to change them all. The whole claim cycle will be adjusted with the number of days entered:

When you select line 10 for an order that has already been claimed partially, you will be taken to a screen with information on the claim that has already been sent:
After selecting the option , you will be presented with the same input form as above. After entering the required number of days you are also taken to an overview screen. But in this case the copy that has been claimed already will have an asterisk against it. You can no longer adjust the dates for that copy:

Manual claims
When you enter a manual claim form the receiving screen (see section 221.2.2) both the date and the status of claim 1 will be updated. Depending on whether all ordered copies were claimed or not, the status will be "Partially"or "Completely".


Automatic claims
Via AFO 251 you can run the claim process. This will pick up any orders that are eligible based on the dates in claim 1, claim 2 and cancellation.
You can then view these eligible orders in AFO 252. At that point the information in the order has not yet changed:

When you are of the opinion the claims can be generated for the orders you can use the option to move them to AFO 253. At that point the claim status will be updated:
Now you can actually print the claims to send them to the supplier (either in hard copy or via email). After that the claim date will also be updated (and the cylce for claim 2 and cancellation adjusted accordingly if applicable):

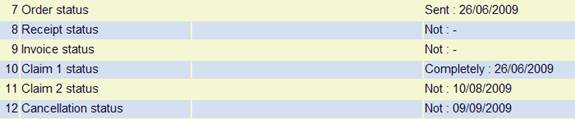
221.2.5 Cancellations
At the time the order was created, dates were added for claim 1, claim 2 and cancellation (either derived from the supplier record or entered manually). Until action is taken, the staus will be "Not".

You can modify the cancellation date by selecting line 12. After this an input form will be displayed:

You can enter a positive number to put the cancellation date further in the future or a negative number (e.g. -10) to bring the cancellation date forward. You cannot bring it further forward than 'today'.
After clicking an overview screen will be displayed:

You can now select one line to reset the date for that copy only or use the option to change them all. The cancellation date will be adjusted with the number of days entered:
Via AFO 251 you can run the cancellation process. This will pick up any orders that are eligible based on the dates in field cancellation.
You can then view these eligible orders in AFO 252. At that point the information in the order has not yet changed:

When you are of the opinion the cancellations can be generated for the orders you can use the option to move them to AFO 253. Now you can actually print the cancellations to send them to the supplier (either in hard copy or via email).
After printing from AFO 253 the cancellation status and date will be updated:


221.3 Parent/child orders
Multiple bibliographic records (“child” items) may be added to a single order/request (“parent” item) in order to handle memberships, serial title splits and changes, monographic series, standing orders, and so on. Staff add this information from Ordering, and can update it in Receiving or Ordering. The order number associated with a child order is the same as that of the parent – only the bib record will be different. Staff may receive, return, and claim copies of the child items separately, and may invoice them separately too.
See the introduction to the acquisitions module for background information.
Any receipts added to a child record are added to both the parent and the child record.
On the receipt screen of the main parent record, if a receipt line was generated by a child record, the child's title will display in the Child title column. Cancellation or undo of receipt information for child titles is not allowed from the parent record. A receipt or invoice generated by a child record must be cancelled from the child record.
Receiving screen of parent record (2 child titles, the last line is the original parent order):


Receiving screen of child record:


221.4 Multi part orders
When you have created a multi part order (i.e. an order type related to series) the receiving process is slightly different.
Retrieve the order in the normal way and go to the receiving screen:
Choose the option to add a new item on the receiving screen (do not use the existing entry for receiving); an input form will be displayed:

· Location and budget number are mandatory, they can be different from the original order. Enter other data as appropriate.
· Click when finished
· • Click on the next screen, when receiving only 1 of the parts
· • The receipt status will now be set to Partial

You can continue receiving against this order by adding new lines as long as is necessary.
But once you have finished receiving all the parts, you can delete the original entry. Only then will the status of the order become 'Completed'.

The receipt status will actually show that one line was deleted:

221.5 Restrictions
Based on parameters set elsewhere in the system various restrictions may apply when receiving items.
221.5.1 Ordering an receiving by same user not allowed
Based on parameters at login level (set via AFO 611 – Passwords – Login Restrictions Acquisitions continued) staff may or may not be allowed to receive items that they ordered themselves.
If this is the case, the following warning will appear:

Authorised users can override this with a password. These passwords are defined in AFO 272 – Order authorisation passwords.
221.5.2 Receipt location restrictions
When receiving has been restricted based on receipt location lists (see the help on AFO 277 for more information on these lists), the following examples may occur.
Items have been ordered for three locations:

Based on a setting in AFO 277 – Receipt location lists, The current location (BD) is not allowed to receive items for CEN. On the receiving screen a message will be displayed in the header pane and only the allowed locations can be received:

In case items are ordered only for locations NOT belonging to your location list, the following message will appear:
